
최근에 Elasticsearch + SpringBoot 조합으로 검색 서비스를 구현 및 유지보수를 했습니다.
검색 서비스를 구현하고 유지보수를 경험을 어떤 과정부터 정리 해볼까 고민을 하다가 먼저 검색어를 하이라이트 적용하는 방법을
정리 하기로 했습니다.
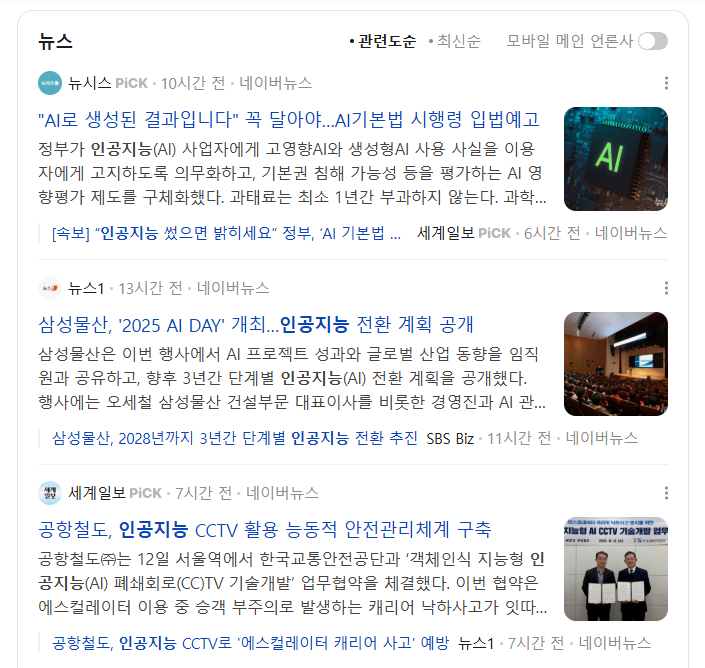
검색어 하이라이트 기능이란? 아래 이미지와 같이, 쿠팡이나 네이버에서 검색을 했을 경우 검색어에 매칭되는 부분을 Bold나 특정 색상으로 처리 하여 사용자로 하여금 검색 결과에 대해서 쉽게 인지 할 수 있도록 하는 기능입니다.

왜 하이라이트인가?
검색 결과에서 사용자가 입력한 검색어가 본문/제목 어디에 등장했는지 즉시 보여주면 클릭률과 탐색 속도가 올라갑니다. ES의 하이라이트 기능은 쿼리와 동일한 분석 체계를 이용해 일치 구간만 스니펫으로 추출하고, 지정한 태그(<mark>…</mark>)로 감싸 표시해 줍니다.
Docker를 이용한 ElasticSearch/Kibana + Nori 설치 : 로컬(Local)에 환경구성
Elasticsearch란?
Elasticsearch(ES)는 JSON 문서를 색인(Indexing)해 초고속 풀텍스트 검색과 집계(Analytics)를 제공하는 분산 검색/분석 엔진입니다. 데이터는 인덱스(index) → 샤드(shard) → 세그먼트(segment) 구조로 저장되고, 검색은 역색인(inverted index) 기반으로 동작합니다.
Kibana란?
Kibana는 Elasticsearch 데이터를 눈으로 보고 관리하는 UI 도구입니다. Elastic Stack의 프런트엔드라고 보면 됩니다.
Nori(노리) 분석기란?
Nori는 Elasticsearch의 한국어 형태소 분석기 플러그인입니다. 한국어의 띄어쓰기, 활용(어미·조사), 복합명사를 다루기 위해 설계되어, ES가 한국어를 ‘검색용 토큰’으로 잘게 쪼개도록 돕습니다.
로컬(Local)에 환경 구성
docker-compose.yml
services:
  elastic:
    build:
      context: .
      dockerfile: Dockerfile
    ports:
      - 9200:9200
    environment:
      - discovery.type=single-node
      - xpack.security.enabled=false
      - xpack.security.http.ssl.enabled=false

  kibana:
    image: docker.elastic.co/kibana/kibana:8.17.4
    ports:
      - 5601:5601
    environment:
      - ELASTICSEARCH_HOSTS=http://elastic:9200
Dockerfile
FROM docker.elastic.co/elasticsearch/elasticsearch:8.17.4
# Nori Analyzer 플러그인 설치
RUN bin/elasticsearch-plugin install analysis-nori
실행
docker compose up -d --build
docker-compose를 사용하여 ElasticSearch + Kibana + Nori 분석기를 설치 해줍니다.
설치 완료 후 설정된 정보 값에 따라 아래 접속 정보로 접속 하면 됩니다.
Elasticsearch → http://localhost:9200
Kibana → http://localhost:5601
TIP: 운영에서는 보안(SSL, 사용자/패스워드) 활성화가 필수입니다. 본 글은 로컬 실습을 위해 비활성화했습니다.
ElasticSearch 인덱스 생성 + 더미 데이터 입력 + 데이터 조회
Kibana에 접속하여 "Management > Dev Tools" 에서 인덱스(Index) 생성, 더미 데이터 입력 그리고 데이터 조회 예시 입니다.
인덱스(Index) 생성
PUT /index_course_v1
{
  "settings": {
    "analysis": {
      "tokenizer": {
        "nori_tokenizer": {
          "type": "nori_tokenizer",
          "decompound_mode": "mixed"
        }
      },
      "analyzer": {
        "korean_analyzer": {
          "type": "custom",
          "tokenizer": "nori_tokenizer",
          "filter": [ "lowercase" ]
        }
      }
    }
  },
  "mappings": {
    "properties": {
      "id":        { "type": "keyword" },
      "title":     { "type": "text", "analyzer": "korean_analyzer" },
      "content":   { "type": "text", "analyzer": "korean_analyzer" },
      "teacher":   { "type": "keyword" },
      "createdAt": { "type": "date" }
    }
  }
}
더미 데이터 입력
POST /index_course_v1/_bulk
{ "index": { "_id": 1 } }
{ "title": "인공지능 기초 강의", "content": "이 강의는 인공지능의 기본 개념을 다룹니다.", "teacher": "홍길동", "createdAt": "2025-11-01" }
{ "index": { "_id": 2 } }
{ "title": "딥러닝 실무", "content": "딥러닝 모델 학습과 CNN, RNN의 이해를 제공합니다.", "teacher": "이순신", "createdAt": "2025-11-02" }
{ "index": { "_id": 3 } }
{ "title": "한국사 핵심 요약", "content": "한국사 주요 사건을 빠르게 정리합니다.", "teacher": "유관순", "createdAt": "2025-11-03" }
전체 데이터 조회
GET /index_course_v1/_search
결과
{
  "took": 1,
  "timed_out": false,
  "_shards": {
    "total": 1,
    "successful": 1,
    "skipped": 0,
    "failed": 0
  },
  "hits": {
    "total": {
      "value": 3,
      "relation": "eq"
    },
    "max_score": 1,
    "hits": [
      {
        "_index": "index_course_v1",
        "_id": "1",
        "_score": 1,
        "_source": {
          "title": "인공지능 기초 강의",
          "content": "이 강의는 인공지능의 기본 개념을 다룹니다.",
          "teacher": "홍길동",
          "createdAt": "2025-11-01"
        }
      },
      {
        "_index": "index_course_v1",
        "_id": "2",
        "_score": 1,
        "_source": {
          "title": "딥러닝 실무",
          "content": "딥러닝 모델 학습과 CNN, RNN의 이해를 제공합니다.",
          "teacher": "이순신",
          "createdAt": "2025-11-02"
        }
      },
      {
        "_index": "index_course_v1",
        "_id": "3",
        "_score": 1,
        "_source": {
          "title": "한국사 핵심 요약",
          "content": "한국사 주요 사건을 빠르게 정리합니다.",
          "teacher": "유관순",
          "createdAt": "2025-11-03"
        }
      }
    ]
  }
}
데이터 조회 with 하이라이트
POST /index_course_v1/_search
{
  "query": {
    "multi_match": {
      "query": "인공지능",
      "fields": [ "title^3", "content" ]
    }
  },
  "highlight": {
    "type": "unified",
    "order": "score",
    "pre_tags": [ "<mark>" ],
    "post_tags": [ "</mark>" ],
    "fields": {
      "title": {
        "number_of_fragments": 0
      },
      "content": {
        "fragment_size": 150,
        "number_of_fragments": 1,
        "no_match_size": 120,
        "require_field_match": false
      }
    }
  },
  "sort": [
    { "_score": "desc" },
    { "createdAt": "desc" }
  ]
}
결과
{
  "took": 11,
  "timed_out": false,
  "_shards": {
    "total": 1,
    "successful": 1,
    "skipped": 0,
    "failed": 0
  },
  "hits": {
    "total": {
      "value": 1,
      "relation": "eq"
    },
    "max_score": null,
    "hits": [
      {
        "_index": "index_course_v1",
        "_id": "1",
        "_score": 9.114277,
        "_source": {
          "title": "인공지능 기초 강의",
          "content": "이 강의는 인공지능의 기본 개념을 다룹니다.",
          "teacher": "홍길동",
          "createdAt": "2025-11-01"
        },
        "highlight": {
          "title": [
            "<mark>인공지능</mark> 기초 강의"
          ],
          "content": [
            "이 강의는 <mark>인공지능</mark>의 기본 개념을 다룹니다."
          ]
        },
        "sort": [
          9.114277,
          1761955200000
        ]
      }
    ]
  }
}
ElasticSearch 인덱스 생성 + 더미 데이터 입력 + 데이터 조회 간단히 정리 해봤습니다. 쿼리에 대하여 자세한 설명은 다음에 더 자세히 정리 해 보려고 합니다. 이번 글은 하이라이트 기능을 구현하는데 집중하여 글을 써보려고 합니다.
SpringBoot + ElasticSerch로 검색 기능 및 UI 구현
SpringBoot 3.5.7 + Java 21 + Gradle 조합으로 심플하게 기능 구현을 정리 해보았습니다.
build.gradle
plugins {
    id 'java'
    id 'org.springframework.boot' version '3.5.7'
    id 'io.spring.dependency-management' version '1.1.7'
}

group = 'com.example'
version = '0.0.1-SNAPSHOT'
description = 'elasticsearch-toy-service'

java {
    toolchain { languageVersion = JavaLanguageVersion.of(21) }
}

repositories { mavenCentral() }

dependencies {
    implementation 'org.springframework.boot:spring-boot-starter-data-elasticsearch'
    implementation 'co.elastic.clients:elasticsearch-java'
    implementation 'org.springframework.boot:spring-boot-starter-web'
    implementation 'org.springframework.boot:spring-boot-starter-thymeleaf'
    compileOnly 'org.projectlombok:lombok'
    developmentOnly 'org.springframework.boot:spring-boot-devtools'
    annotationProcessor 'org.projectlombok:lombok'
    testImplementation 'org.springframework.boot:spring-boot-starter-test'
}
application.yml
server:
  port: 8080

spring:
  application:
    name: elasticsearch-search-demo

  elasticsearch:
    uris: http://localhost:9200
    connection-timeout: 5s
    socket-timeout: 10s

  thymeleaf:
    cache: false
    prefix: classpath:/templates/
    suffix: .html
문서 매핑 엔티티(Entity)
@Document(indexName = "index_course_v1")
@Data
@Builder
@NoArgsConstructor
@AllArgsConstructor
public class CourseDocument {
    @Id
    private String id;

    @Field(type = FieldType.Text, analyzer = "korean_analyzer")
    private String title;

    @Field(type = FieldType.Text, analyzer = "korean_analyzer")
    private String content;

    @Field(type = FieldType.Keyword)
    private String teacher;

    @Field(type = FieldType.Date)
    private String createdAt;
}
서비스(Service): ElasticsearchOperations + Spring Highlight API
@Service
@RequiredArgsConstructor
public class CourseSearchService {
    private final ElasticsearchOperations elasticsearchOperations;

    public List<Map<String, Object>> searchCourses(String keyword) {
        HighlightParameters params = HighlightParameters.builder()
                .withPreTags("<mark>")
                .withPostTags("</mark>")
                .withFragmentSize(150)
                .withNumberOfFragments(1)
                .build();

        List<HighlightField> fields = List.of(
                new HighlightField("title"),
                new HighlightField("content")
        );

        Highlight springHighlight = new Highlight(params, fields);
        HighlightQuery highlightQuery = new HighlightQuery(springHighlight, CourseDocument.class);

        NativeQuery query = new NativeQueryBuilder()
                .withQuery(q -> q.multiMatch(m -> m
                        .fields("title^3", "content^2")
                        .query(keyword)))
                .withHighlightQuery(highlightQuery)
                .build();

        SearchHits<CourseDocument> hits = elasticsearchOperations.search(query, CourseDocument.class);

        List<Map<String, Object>> results = new ArrayList<>();
        hits.forEach(hit -> {
            Map<String, Object> map = new LinkedHashMap<>();
            CourseDocument doc = hit.getContent();
            map.put("id", doc.getId());
            map.put("title", doc.getTitle());
            map.put("content", doc.getContent());
            map.put("teacher", doc.getTeacher());

            var hf = hit.getHighlightFields();
            if (hf != null) {
                map.put("titleHighlight", String.join(" ", hf.getOrDefault("title", List.of())));
                map.put("contentHighlight", String.join(" ", hf.getOrDefault("content", List.of())));
            }
            results.add(map);
        });
        return results;
    }
}
컨트롤러(Controller) & 뷰(View)
@Controller
@RequiredArgsConstructor
public class CourseSearchController {

    private final CourseSearchService courseSearchService;

    @GetMapping("/")
    public String index() {
        return "search";
    }

    @GetMapping("/search/result")
    public String search(@RequestParam("q") String q, Model model) {
        var results = courseSearchService.searchCourses(q);
        model.addAttribute("results", results);
        model.addAttribute("keyword", q);
        return "search-result";
    }
}
search.html : 검색 입력 View
<!DOCTYPE html>
<html xmlns:th="http://www.thymeleaf.org" lang="ko">
<head>
    <meta charset="UTF-8">
    <title>강의 검색</title>
    <style>
        body {
            font-family: 'Pretendard', sans-serif;
            background: #f6f8fa;
            margin: 40px;
        }

        h1 {
            color: #2c3e50;
        }

        .search-box {
            background: #fff;
            border-radius: 10px;
            box-shadow: 0 2px 6px rgba(0,0,0,0.1);
            padding: 30px;
            max-width: 500px;
        }

        input[type=text] {
            width: 80%;
            padding: 10px;
            border: 1px solid #ccc;
            border-radius: 6px;
        }

        button {
            padding: 10px 16px;
            border: none;
            border-radius: 6px;
            background-color: #007bff;
            color: white;
            cursor: pointer;
        }

        button:hover {
            background-color: #0056b3;
        }

        .footer {
            margin-top: 40px;
            color: #888;
            font-size: 0.9em;
        }
    </style>
</head>
<body>
<h1>강의 검색</h1>

<div class="search-box">
    <form action="/search/result" method="get">
        <input type="text" name="q" placeholder="예: 인공지능, 한국사, 딥러닝" required>
        <button type="submit">검색</button>
    </form>
</div>

<div class="footer">
    <p>© 2025 Search Example</p>
</div>
</body>
</html>
search-result.html : 검색 결과 View
<!DOCTYPE html>
<html xmlns:th="http://www.thymeleaf.org" lang="ko">
<head>
    <meta charset="UTF-8">
    <title>검색 결과</title>
    <style>
        body {
            font-family: 'Pretendard', sans-serif;
            background: #f6f8fa;
            margin: 40px;
        }

        h1 {
            color: #2c3e50;
        }

        a {
            color: #007bff;
            text-decoration: none;
        }

        a:hover {
            text-decoration: underline;
        }

        form {
            margin-bottom: 20px;
        }

        input[type=text] {
            width: 300px;
            padding: 8px;
            border: 1px solid #ccc;
            border-radius: 6px;
        }

        button {
            padding: 8px 14px;
            border: none;
            border-radius: 6px;
            background-color: #007bff;
            color: white;
            cursor: pointer;
        }

        button:hover {
            background-color: #0056b3;
        }

        .result {
            background: #fff;
            border-radius: 10px;
            box-shadow: 0 2px 6px rgba(0,0,0,0.1);
            padding: 20px;
            margin-bottom: 20px;
        }

        .title {
            font-size: 1.3em;
            font-weight: bold;
            color: #2c3e50;
        }

        .content {
            font-size: 1em;
            margin-top: 8px;
            color: #555;
        }

        .teacher {
            font-size: 0.9em;
            margin-top: 6px;
            color: #888;
        }

        mark {
            background-color: #ffe66d;
            color: #000;
        }

        .back {
            margin-top: 20px;
            display: inline-block;
            color: #555;
            text-decoration: underline;
            cursor: pointer;
        }

        .no-result {
            color: #999;
            margin-top: 30px;
            font-size: 1.1em;
        }
    </style>
</head>
<body>

<h1>검색 결과</h1>

<form action="/search/result" method="get">
    <input type="text" name="q" th:value="${keyword}" placeholder="검색어 입력">
    <button type="submit">다시 검색</button>
</form>

<div th:if="${#lists.isEmpty(results)}" class="no-result">
    검색 결과가 없습니다.
</div>

<div th:each="course : ${results}" class="result">
    <div class="title"
         th:utext="${#strings.isEmpty(course.titleHighlight) ? course.title : course.titleHighlight}">
    </div>
    <div class="content"
         th:utext="${#strings.isEmpty(course.contentHighlight) ? course.content : course.contentHighlight}">
    </div>
    <div class="teacher" th:text="'강사: ' + ${course.teacher}"></div>
</div>

<a href="/" class="back">← 검색 페이지로 돌아가기</a>

</body>
</html>
실행결과

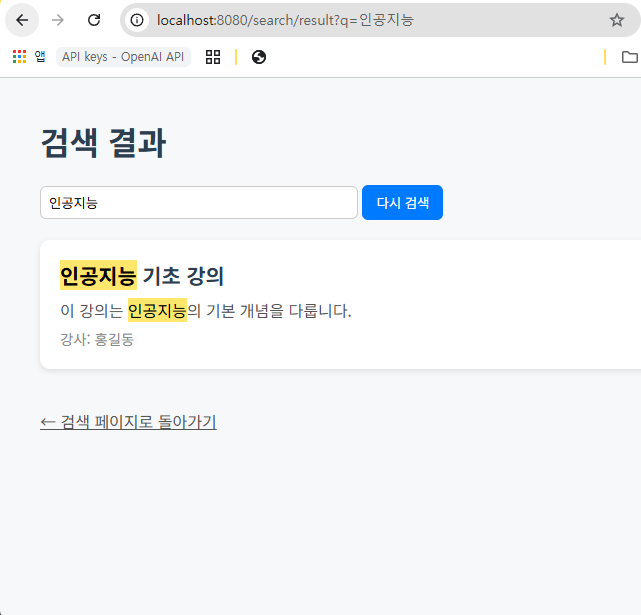
여기까지 Docker + Elasticserch + SpringBoot 조합으로 환경 구성부터 기능 구현까지 정리해 보았습니다.
글재주가 뛰어나진 않아 재미 없는 글을 여기까지 읽어 주셔서 감사합니다!!
질문 댓글을 언제나 환영입니다:)
'DB' 카테고리의 다른 글
| [Elasticsearch] 인덱스(Index) 생성 및 도큐먼트(Document) CURD (0) | 2025.12.14 |
|---|---|
| [Elasticsearch] 기본 개념 및 조작하기 (1) | 2025.12.12 |
| [Redis] Cache-Aside(Lazy Loading) 패턴 적용(With SpringBoot) (0) | 2025.11.16 |
| [Redis] Redis 계정 생성 및 systemd 등록 (0) | 2025.05.19 |
| [Redis] Redis 도입을 위한 설치 및 세팅 (1) | 2025.05.18 |
| [Oracle] EXISTS VS COUNT 성능 차이 (0) | 2025.04.05 |
| [MariaDB/MySQL] general_log 설정 및 확인하기 (0) | 2024.08.26 |
| [MariaDB/MySQL] DB 환경 세팅(2) - MariaDB Server 외부 접속을 위한 방화벽(Firewall) 세팅 (0) | 2024.07.31 |


